Spare Change in Potential: How to Make a Battery From Coins
I don’t know what about you, but I have a box I keep my change in. I’ve bene thinking for a while what I can do with that change – buy a boat, rent a jetski, get a trip on those cool X-Planes that go up to space, etc etc. Big plans for small money, I know, but.. I’ll keep on dreaming.
Now, though, you too have something to do with your extra nickels and pennies you keep safe for future plans: You can do science with them! Yay!
[youtube_video id=”6_0yXOxTVRU”] So, this experiment is very simple and fun, and I wanted to do it a bit different than what you probably already know (and what I ended up doing eventually in the video). When I was roaming around the internet looking for more ideas and information, I saw this picture and decided I should try it out (even though I had no doubt, in this case).Okay, so maybe I went a bit too far with my love for fun: after all, who knew those ice boxes fight back. I didn’t.
But we can learn a lot from this experiment, as well as this experience. We will start with the scientific principles. Then, we’ll go on to my flying metal clips. Pooooiiing.
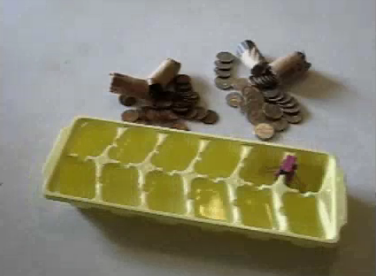
What you need?
- Pennies.
- Nickels.
- Salt water (just mix water with about 2 table spoons of salt)
- Tissue paper.
- Voltmeter or LED or small light bulb – anything that will prove to you that there is voltage in this spare change tower.
- Depending on your tower-building skills, you may need copper wires.
What do you do?
To create a difference in potentials (which will lead to the existence of voltage and ‘power up’ your lightbulb/LED/voltmeter) you need to create a small tower, alternating a penny, a tissue paper soaked with saltwater and a nickel.
Penny -> saltwater -> Nickel -> saltwater -> Penny -> saltwater -> Nickel … and so on.
Easy!
Note: Make sure you have access to the bottom of the pile. By the time I finished building my little spare-change tower I found out I can’t reach the bottom of the pile to check for voltage, and had to squeeze in another bit of copper wire. If you need one, get it, but if you “play” it right (like, put the first penny sticking out a little) you can do it without any wires at all.
What’s going on?
When we put table salt in water we create a mixture that is electrically conductive. The saltwater mixture is an electrolyte. An electrolyte is a substance that has free ions and conducts electricity.
The electrolyte reacts with different metals, allowing for an exchange of electrons from the metal to the solution. But different metals react differently. A Nickel is made of approximately 75% Copper and 25% Nickel. A Penny has about 97% Zinc and 3% Copper. The difference between the metals causes a difference in reactions to the electrolyte.
This difference creates a difference in electrical potential, which is voltage. And it can light up your lightbulb, your LED or show the difference on a voltmeter.
A bit of History
This experiment, or something very close to it, was done by Alessandro Volta, who created the first cell battery.
In his experiment, he alternated plates of Zinc with plates of Copper, with an electrolyte substance between them (He used either saltwater or sulfuric acid), and created the first cell battery.
This type of battery, however, is short-lived. The voltage stops when the chemical reaction creates hydrogen bubbles that (initially help the procedure, but) later form a sort of ‘barrier’ to one of the metal electrodes. It is also not very safe (and not necessarily due to what you’ve wittnessed in the video) because sulfuric acid is quite dangerous, even when diluted.
But it was certainly the start for the batteries we have today, that operate on the exact same principle!
What happened in my first try?
Okay, so you’ve seen the video and you’re laughing. Great. Glad I could brighten your day with my mishaps. But now what? Does that mean you can’t do it? Probably not. The method of connecting the “electrodes” (spare change) to the walls of the ice box should work just fine, as long as you have enough time to mess with it. I was fighting against the clock, as the sun was setting and the lighting in my apartment is quite poor when dark.
But take your time, try this method out, and let me know if you got it, it seems like fun!
About Experimental Errors
We’re talked before about experimental errors, but I think this experiment (and the “blooper” that accompanied it) is a good chance to state one, very important, issue about science and experimentation:
Mistakes are very important.
We learn from our mistakes. It sounds so repetitive, I know, you’ve heard it from your kindergarden teacher a billion times, but it’s true, and it’s even truer for science. Experimental errors should be examined and analyzed. It may be the equipment, it may be the settings, it may be that it’s not an error at all but a brand new discovery you are going to win the Nobel prize for.
Mistakes happen. The important thing is to understand why they happen.
This is also why true scientists (in true labs) never settle for a single experiment. The experiments are always repeated, over and over, but multiple people. Then, they are analyzed – mistakes and all – and summarized. Then, other scientists from other labs look at the experiment and result and try to repeat them too. If the experiment can be repeated with similar (or same) results, then it is probably actually indicative. If other scientists cannot repeat the experiment, there is a big problem with the suggested conclusion.
This is part of the scientific method.
In my videos I am showing you simple demonstrations of scientific phenomena. This is, by no means, a replacement for actual scientific experiments in labs. I will probably never be able to get actual significat results that affect the scientific community (or the way we live and think) by recording a once-performed experiment at my house. But that’s also not my intended purpose.
I don’t mean to give you “new” radical answers, I mean to give a taste of waht science is about, and how you can check these principles and prove them for yourselves at your own home without going to a fancy lab, or spending lots of time for a PhD. Not that PhDs aren’t important..
Take these videos as examples of what and how things are done, and what the scientific method is all about. Other than being fun (and sometimes funny), these experiments can show you that if you can reach a relatively accurate conclusion at your own home, then true laboratories doing the same (or similar) experiments with much better and more accurate equipment can get much better and more accurate results. But at least now you know how they do it.
More References
- The Amazing Meeting 6: http://www.randi.org/joom/component/option,com_registrationpro/Itemid,33/func,details/did,1/
- James Randi Educational Foundation: http://www.randi.org/
- Alessandro Volta: http://en.wikipedia.org/wiki/Alessandro_Volta
- A Cent (Penny): http://en.wikipedia.org/wiki/Cent_(United_States_coin)
- A Nickel: http://en.wikipedia.org/wiki/Nickel_(United_States_coin)
- How batteries work: http://en.wikipedia.org/wiki/Battery_%28electricity%29#How_batteries_work
- This experiment at the US Mint (Dept of Treasury) site: http://www.usmint.gov/kids/teachers/lessonPlans/viewLP.cfm?lessonPlanId=138
- This experiment in “Make Magazine”: http://blog.makezine.com/archive/2006/11/pennypowered_le.html
2 comments
Reply

Thanks for the post
Great experiment as always! Hope to see many more!